
- From the File menu: Choose Copy to Screen.jpg. This saves a copy of the aerial photo or map currently displayed onscreen to a file named Screen.jpg in the same folder that USAPhotoMaps is installed in.
- Print Screen: Press the Print Screen key to save the current image to the Clipboard. If you want to save only a portion of the map or aerial photo that appears onscreen.
- BigJpeg: Use the BigJpeg utility. Doug Cox has a free utility that creates a single, 1-meter resolution, JPG format graphics file from a photo or map. You define the boundaries of an area you want to save in USAPhotoMaps and then run BigJpeg to create the graphics file. You can download BigJpeg, with complete instructions, at http://jdmcox.com.
Friday, December 31, 2010
Saving Aerial Photos
After you have an aerial photo or map displayed onscreen, you can save the image to use with other programs:
Creating and Using Multiple Map Files
USAPhotoMaps uses a map file to name areas that have downloaded aerial photo or map data. A map file is a bookmark for a general vicinity or location. For example, you might have downloaded aerial photos for the entire Grand Canyon. Instead of scrolling to view photos at each end, you could create two map files, one called North Grand Canyon and the other South Grand Canyon.
To create a map file bookmark
To select and display a new map file
To create a map file bookmark
- From the File menu, choose New Map File.
- In the New Map dialog box that appears, enter the name of the map file and the coordinates that you’d like to bookmark.
- Click OK.
To select and display a new map file
- From the File menu, choose Open Map File.
- Select the name of the map file to load.
- Click OK.
Tuesday, November 30, 2010
Entering text in USAPhotoMaps
After you have an aerial photo displayed, you can add text labels to different
features when the image is displayed at the 1- or 2-meter zoom levels. To enter
a text label
1. Move the mouse cursor to the location where you want the text to start.
2. Hold down the Shift key.
3. Move the cursor in the direction you want the text to be aligned. A line is temporarily drawn as you move the cursor. For example, if you draw a line at a 45-degree angle, the text will flow at a 45-degree angle.
4. Release the Shift key.
5. In the dialog box that appears, type in the text label and click OK.
A list of all the text labels is displayed.
Text in a label is limited to 60 characters and can be edited or deleted by choosing Text➪List.
You can set the text color by choosing File➪Preferences➪Colors. The Color Preference dialog box, which isn’t all that intuitive, uses a series of radio buttons that correspond to red, green, and blue values. Your best bet for choosing a color you’d like is to enter some text and then display the Color Preference dialog box. When you select different combinations of color radio buttons, the text you entered changes color.
Enhancing contrast in USAPhotoMaps

One of the things you’ll notice as you start to view aerial photos is that the contrast might be lighter or darker with certain images. This has to do with the amount of sunlight when the photo was taken and the background color of the terrain.
To enhance less-than-optimal contrast, USAPhotoMaps has a nifty feature that lets you adjust the contrast of the photos displayed onscreen by either lightening or darkening them. This can really enhance detail in a photo.
You can control the contrast of a photo by using these keys:
_ Lighten: Press the B key.
_ Darken: Press the D key.
You can also set contrast by selecting Brightness from the View menu, including restoring the contrast back to its default setting.
Sunday, October 31, 2010
Zooming in and out

You can zoom in and out on an aerial photo or map to see more detail or get a larger, big picture view. For zooming, use these keys:
- Zoom in: Press Page Down or the plus (+) key.
- Zoom out: Press Page Up or the minus/dash (–) key. The current zoom level appears in the window title bar, so you always know how far you’ve zoomed in or out.
- Topographic maps: 4, 8, 16, or 32 meters-per-pixel
- Aerial photos: 1, 2, 4, 8, 16, 32, or 64 meters-per-pixel If you’re switching back and forth between aerial photos and topographic maps, use either a 4 or an 8 meters-per-pixel zoom level. This will give you close to a one-to-one size representation of features on the aerial photo and the topographic map.
Moving around the USAPhotoMaps

You’ve probably noticed that USAPhotoMaps doesn’t use scroll bars like other Windows programs. Not to worry; you can still move around in a photo or map by using the keyboard navigational arrow keys:
If you see gray squares while you’re scrolling, map data has yet to be downloaded for that particular area. Figure above shows gray squares with aerial photo data that hasn’t been downloaded. Here are two ways to fill the squares with map or photo data:
- From the File menu, choose Download Map Data➪Fill Screen.
- Press the F key.
Instead of scrolling, you can also go directly to a location that you know the coordinates of. Just choose the Go To Lat/Lon item in the View menu and enter the coordinates.
USAPhotoMaps has two display modes: aerial photo and topographic map.
When you download data to fill in the gray squares, only data for the particular
mode that you’re in is downloaded.
Switching between aerial photos and topographic maps

After you know where you are in a photo, look at the commands that you can use to move around. As I mention earlier, TerraServer-USA provides both aerial photos and USGS topographic maps,and USAPhotoMaps lets you switch between the two types of images. (Figure above shows a topographic map.) This is useful because you can look at a topographic map and then immediately see what the same location looks like as an aerial photo. This is a big advantage because aerial photos often show more feature detail than topographic maps.
Here are the two ways (in USAPhotoMaps) to display a topographic map version of an aerial photo you’re viewing:
- From the View menu, choose Map Type➪Topo.
- Press the T key.
- If gray squares appear onscreen, you haven’t downloaded map data for that area yet. To download the map, press the F key. To switch back to an aerial photo view of the location
- From the View menu, choose Map Type➪Photo.
- Press the P key.
Thursday, September 30, 2010
Getting the Most from Aerial Photos
After you have an aerial photo displayed, navigate inside the image. USAPhotoMaps has a number of different commands to view and manipulate the photo.
The datum used for all TerraServer-USA maps is NAD 83. This is nearly identical to the WGS 84 datum used as a default by GPS receivers. If you plan on using your GPS receiver with USAPhotoMaps, be sure that the datum settings match.
The first thing you’ll notice is that when you move the mouse cursor around the screen, map coordinates appear in the window title bar. This feature allows you to move the cursor over a feature that’s shown on the aerial photo and get its precise coordinates.
You can change how you want the coordinates displayed from the View menu. Choose the Lat/Lon item and then specify whether you want the coordinates shown in decimal degrees, degrees and decimal minutes, degrees/minutes/ seconds, or UTM formats.
Press the X key to display a dialog box with the coordinates that the cursor is currently over. You can copy the coordinates from this dialog box and paste them into another program.
Downloading Aerial Photographs
The first time you run USAPhotoMaps, a dialog box appears that prompts you to create a new map. You need to enter the following:
• Universal Transverse Mercator (UTM)
If you don’t know the latitude and longitude coordinates of the location you’re interested in seeing, quickly skip over to Chapter 11 to read how to find coordinates of place names.
As an example, create an aerial photomap of Seattle, Washington.
1. Enter the name, latitude, and longitude in the New Map dialog box.
• Name: Seattle
• Latitude: 47.61431
• Longitude: 122.32898
2. Click OK.
A series of gray squares appear onscreen.
3. Download aerial photos from TerraServer-USA for the area that you specified (with the latitude and longitude coordinates). Make sure that you’re connected to the Internet and then press the F key.
A mosaic of aerial photograph images replaces the gray squares as the screen is filled with data from TerraServer-USA. The final result is shown in Figure below.
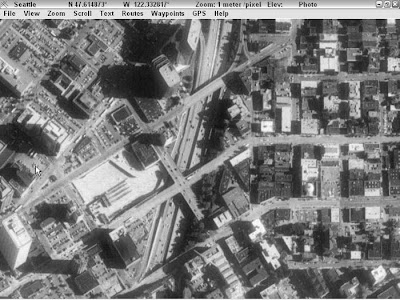
If you’re using a firewall, your computer might complain when USAPhotoMaps tries to connect to TerraServer-USA. Because the program is just downloading map data, you can give permission for USAPhotoMaps to access the Internet. If you plan to use USAPhotoMaps to build an extensive aerial photo collection, a high-speed Internet connection will make your life much easier. Each individual aerial photo or topographic map image in the displayed mosaic is roughly 50–200K in size. (The actual size depends on how much unique terrain is shown in the image.) At 2 meters-per-pixel resolution, it takes 70 images to fill the screen of a 1024 x 768 monitor; that’s anywhere from 7–17MB of data to download.
- What you want to name the map.
- The coordinates of the area you’re interested in viewing. The coordinates can be in either
• Universal Transverse Mercator (UTM)
If you don’t know the latitude and longitude coordinates of the location you’re interested in seeing, quickly skip over to Chapter 11 to read how to find coordinates of place names.
As an example, create an aerial photomap of Seattle, Washington.
1. Enter the name, latitude, and longitude in the New Map dialog box.
• Name: Seattle
• Latitude: 47.61431
• Longitude: 122.32898
2. Click OK.
A series of gray squares appear onscreen.
3. Download aerial photos from TerraServer-USA for the area that you specified (with the latitude and longitude coordinates). Make sure that you’re connected to the Internet and then press the F key.
A mosaic of aerial photograph images replaces the gray squares as the screen is filled with data from TerraServer-USA. The final result is shown in Figure below.

If you’re using a firewall, your computer might complain when USAPhotoMaps tries to connect to TerraServer-USA. Because the program is just downloading map data, you can give permission for USAPhotoMaps to access the Internet. If you plan to use USAPhotoMaps to build an extensive aerial photo collection, a high-speed Internet connection will make your life much easier. Each individual aerial photo or topographic map image in the displayed mosaic is roughly 50–200K in size. (The actual size depends on how much unique terrain is shown in the image.) At 2 meters-per-pixel resolution, it takes 70 images to fill the screen of a 1024 x 768 monitor; that’s anywhere from 7–17MB of data to download.
Enhancing TerraServer-USA with USAPhotoMaps

TerraServer-USA is a popular Web site that displays free aerial photographs and topographic maps of the U.S. that are produced by the United States Geological Survey (USGS).
And although TerraServer-USA is a great Web-hosted mapping service, it has several limitations:
- Only a relatively small geographic area can be displayed.
- You can’t edit downloaded photos and maps.
- GPS receiver data can’t be used with the photos and maps.
Tuesday, August 31, 2010
From the Air with USAPhotoMaps
 Aerial photos complement other types of maps because they give you a snapshot of reality. Programs that display aerials (map-speak shorthand for aerial photos) are both inexpensive and easy to use. In this chapter, I review mapping programs that can exploit aerial photos, primarily focusing on the popular shareware application, USAPhotoMaps. To better illustrate the capabilities and functions of this program, I walk you through downloading an aerial photo, scrolling and zooming, interfacing the program with a GPS receiver, and saving map data. To get the most from this blog section, download and install USAPhotoMaps (http://jdmcox.com) and then use the program to work through the examples in the following pages. Unlike some shareware programs, USAPhotoMaps isn’t crippled; that is, all its features work when you download the program. If you find the program useful, you can make a donation to the author’s PayPal account.
National Geographic mapping products

Many children got their first introduction to maps from National Geographic magazines. Each month, a carefully folded paper map of somewhere foreign and exotic came nestled inside the magazine. National Geographic is still in the map business, now producing several topographic map programs. I was one of those kids that got hooked on National Geographic maps when I was growing up, and I still like them today. The company’s map software is easy to use and strikes a nice balance of having just the right number and types of features, without having too many whistles and bells. National Geographic software has all the same basic features as other mapping programs, such as GPS support, route planning, printing maps, and searching for locations. The only exception is that National Geographic programs currently use only relief shading to show elevation and don’t render 3-D map images.
National Geographic has a number of paper and electronic map products available; visit www.nationalgeographic.com/maps. The two digital map products that you’ll find the most practical for backcountry use are Back Roads Explorer and TOPO!
Back Roads Explorer
Back Roads Explorer contains 1:100,000 scale topographic maps and larger overview maps of the entire United States. In addition to terrain data, the software also has road and street data that you can overlay on top of a map, including paved and unpaved roads.
Unlike DeLorme’s Topo USA, Back Roads Explorer uses raster maps (scanned versions of paper maps), which contain more detail. If you prefer more of a traditional looking map to one that looks like it was computer-generated, you’ll like Back Roads Explorer.
Raster maps take up more disk space than vector maps because they’re scanned images of paper maps. Vector maps are smaller because they’re composed of lines and shapes. For example, the raster map data for the entire United States that comes with Back Roads Explorer fits on 17 CDs, but the same vector data in Topo USA comes on 6 CDs.
With the option of overlaying up-to-date roads over topographic maps, Back Roads Explorer is ideal for basic navigation and is especially well suited for 4 x 4 enthusiasts who use a laptop and GPS receiver.
TOPO!
National Geographic’s TOPO! line of software provides 1:24,000 maps for each of the states and is comparable with Maptech’s Terrain Navigator and DeLorme’s 3-D TopoQuads products.
One feature that I especially like in the TOPO! products is mapXchange. You can visit the National Geographic Web site and select the state you have TOPO! maps for. A list of hikes and other outdoor activities is displayed with descriptions, and you can freely download files that contain waypoints and routes you can use with TOPO! If you like, you can also upload your own files of places you’ve been to share with other outdoor enthusiasts.
DeLorme mapping products

DeLorme, well known for its Street Atlas USA road navigation software, also makes two topographic mapping programs: Topo USA and 3-D TopoQuads. DeLorme uses the same user interface for its entire line of consumer mapping products, so if you’re a happy user of Street Atlas USA and are looking for a map program for off-road use, it makes sense to keep things in the DeLorme family. DeLorme was one of the first vendors to offer customers a choice of map data on CDs or DVDs. If you have a DVD player on your PC, DVDs are far more convenient because you don’t have as many discs to keep track of, and you don’t have to swap discs as often to view maps of different areas. DeLorme topographic mapping products can interface with GPS receivers, display 3-D maps, search for locations, provide elevation profiles, and plan for trips just like other map programs. These two unique features in the program are especially useful:
_ Satellite imagery: DeLorme sells 10-meter resolution color satellite data for each state. When you use the images with DeLorme mapping products, you can view the satellite photos side by side with topographic maps in 2-D or 3-D.
_ Mural printing: If you need to produce a large map for a presentation, the programs support printing mural maps that are up to three pages high by three pages wide that you can join to make a large map. To read more about DeLorme’s mapping programs, visit www.delorme.com.
Saturday, July 31, 2010
In addition to Maptech and its topographic mapping programs, DeLorme and National Geographic also offer software that’s suited for off-road use. As previously mentioned, most topographic map programs have the same basic features; the biggest difference is their user interface. Because I don’t have the time to cover the other mapping programs in detail, this section provides a brief description of a few popular programs, shows some screenshots to give you an idea of what the user interface is like, and provides manufacturer Web sites to get more product information. When it comes to choosing a topographic map program, you really can’t go wrong with any of the programs mentioned in this chapter.
You can’t upload detailed maps to your GPS receiver from any of the programs discussed in this chapter. GPS receivers that display maps can use only proprietary maps (sold by the GPS manufacturer), and these tend to show considerably less detail than maps you can display on your PC. Several topographic map software companies do offer products that you can use with a Pocket PC/Palm PDA and GPS receivers that can display detailed topographic maps just as they appear on a PC screen.
You can’t upload detailed maps to your GPS receiver from any of the programs discussed in this chapter. GPS receivers that display maps can use only proprietary maps (sold by the GPS manufacturer), and these tend to show considerably less detail than maps you can display on your PC. Several topographic map software companies do offer products that you can use with a Pocket PC/Palm PDA and GPS receivers that can display detailed topographic maps just as they appear on a PC screen.
Charting elevation profiles in Terrain Navigator
 Although the 3-D map view gives you a visual sense of how steep your hike is, you can get even more detailed information by using the Terrain Profile tool. This feature shows you the elevation gain/loss of your hike in pictures and numbers. Here’s how to use this tool:
1. Make sure that the map is displayed in 2-D.
2. Click the Information tool on the toolbar (an arrow with a question mark).
3. Right-click the track and select Profile from the pop-up menu.
A Profile dialog box opens that displays an elevation chart of the trail as well as how many feet you’ll be climbing and descending over the course of the trip.
Vertical profiles may have a lot of vertical exaggeration to show relative steepness. This can make terrain appear steeper than it actually is.
Using a 3-D map image in Terrain Navigator
 Use Terrain Navigator to display 3-D, shaded relief images of a map to help you better understand the terrain. To show a 3-D image of the map that’s currently displayed onscreen, click the 3-D View button on the toolbar. (It looks like mountains with a small bar underneath.)
The topographic map of Fuji Mountain ) is displayed in 3-D.
A red rectangle appears on the overview map, showing you the general location of the terrain, based on the current 3-D view of the map.
To control the view of the 3-D map
- Click and drag the cursor on the map to rotate the image.
- Use the trackball control to the left of the map to rotate up, down, left, and right. You can also use the keyboard navigation arrow keys.
- Use the Elevation slider bar control (it has a picture of a truck, a helicopter, and an airplane) to adjust the height you’re viewing the map from.
- Use the zoom arrows above the Elevation slider bar to control how close forward or backward your view of the terrain is.
- Use the Vertical Exaggeration buttons beneath the trackball control to increase and decrease the vertical scale so elevation differences are easy to distinguish.
Wednesday, June 30, 2010
Other Maptech products

In addition to Terrain Navigator, Maptech has several other topographic map products that you might find useful, including
- Terrain Navigator Pro is Maptech’s high-end version of Terrain Navigator targeted toward professional map users and is priced around $300 per state. Use its enhanced features to
- Display aerial photographs downloaded from the Maptech’s Internet servers.
- Locate street addresses.
- Link digital photos, spreadsheets, and other files with locations on maps.
- Export maps for use with Geographic Information System (GIS) programs such as ArcGIS and AutoCAD.
- National Park Digital Guide has topographic maps of all the National Parks in the United States, including photos and information about sights and services both inside and outside the parks. The guide costs around $50.
- Appalachian, Continental Divide, and Pacific Crest Trail products contain topographic maps for the areas around each one of these classic trails and cost under $100. The Appalachian Trail software, priced around $50, has extensive guidebook information along with maps.
- Outdoor Navigator is a mapping program for Pocket PCs and Palm PDAs that lets you load detailed topographic maps on your PDA. The product is priced around $100.
Planning a Trip with Terrain Navigator
 Suppose that your friends gave you some vague directions about taking a series of logging roads to get to the trailhead. The trail wasn’t very well marked, but when they found it, it climbed steeply for a couple of miles to the summit. However, the last time you listened to your friends, the short pleasant hike that they described turned into an eight-hour death march through thick underbrush and straight up a rock face. This time, you decide to use Terrain Navigator to get a better picture of this little outing.
- Look on the map for a trail. You want the one that goes to the summit of Fuji Mountain. (Only one trail goes to the top.) As you follow it down, you see that it intersects with an unimproved road — probably the logging road your friends told you about. The symbol for a trail on USGS maps is a single dashed line. Lines with two sets of dashes indicate an unimproved road.
- Click the Marker tool on the toolbar, move the cursor to where the road intersects the trail, and click to create a waypoint for the trailhead (the beginning of the trail). The Marker tool looks like a pyramid. This creates a GPS waypoint at that location named Mrk1. Click the name and rename it Fuji Trailhead.
- Use the Marker tool to create another GPS waypoint at the end of the trail. This marks a waypoint at the summit of Fuji Mountain. Rename this one Fuji Mountain (see how in Step 2). With these two GPS waypoints set, you now know where the trail starts and ends. If you’re using a GPS receiver, the first waypoint will help you find the trailhead, and the second waypoint will help you reach your final destination. You can manually enter the waypoints in your GPS receiver or have Terrain Navigator upload them for you. Be sure that the map datum matches the datum your GPS receiver is using.You can set the map datum in Terrain Navigator by choosing File➪Preferences➪General.
- Click the Track tool on the toolbar to draw your planned course of travel on the map. The Track tool, which looks like a pencil, works by drawing a line from the last place you clicked. However, it doesn’t allow you to freehand draw like with a real pencil.
- Follow the trail by clicking the mouse (like playing connect-the-dots). Trace the trail that heads up Fuji Mountain, starting at the road intersection. After you click, the current length (in feet or miles) of the track is displayed in the status bar below the map.
- When you’re finished, right-click and choose Finish Track from the pop-up menu.
- Edit the track, giving it a name and changing its color if you like. Move the cursor on the track that you just created, right-click, and choose Edit from the pop-up menu. You can now name the track (use Fuji) and change its color if you like. You can upload the waypoints and track data to your GPS receiver before you leave on the hike to help with your navigation. Use Terrain Navigator to turn a track into a route. A route is a course of travel that’s broken up into a series of waypoints that define segments of your trip. You navigate between the route waypoints to reach your final destination. Typically the number of track points is reduced when you convert a track to a route. Thus, there’s not as much detail, and you end up with straight lines instead of curves. If you want to upload a course of travel to your GPS receiver, it’s more efficient to use a route than a track. To convert a route, right-click a track and choose Create Route from the pop-up menu. Even if you don’t have a GPS receiver to which you can upload waypoint, route, or track data, you can use Terrain Navigator to find a trail, print a map of that trail to take with you, and determine the distance of your hike. Just remember to bring your compass!
Changing the map size

Terrain Navigator offers two ways for you to change the size of a map and show more detail or area.
- Zooming: The toolbar has two icons bearing a magnifying glass: one with a plus sign and the other with a minus sign. When the plus sign magnifying glass is selected, you zoom in when you click the map. When the minus sign magnifying glass is selected, clicking zooms you out.
- Changing the scale: Maps can be displayed in either 1:24,000 (more detail, smaller area) or 1:100,000 scale (less detail, larger area). Note the map scale command in the toolbar that displays a menu for selecting the scale of your choice.
Monday, May 31, 2010
Moving around in a map with Terrain Navigator

More than likely, you’ll want to move around the map and check out the countryside that currently isn’t being displayed onscreen. Here’s how:
- Move the cursor to one of the edges of the map. The cursor turns into an arrow; click to scroll the map in the direction that the arrow points.
- Click the Drag tool on the toolbar. (It’s shaped like a hand.) Move the cursor to the map and hold down the left mouse button; then scroll the map by dragging.
- Click the Center tool on the toolbar. (It’s shaped like a bull’s-eye with crosshairs.) With this tool selected, wherever you click the map, the map is drawn so it’s centered at that location.
- Move the rectangle in the overview map. A small overview map appears to the left of the main map. A blue rectangle shows what part of the map is currently displayed onscreen. You can drag the overview map rectangle to show a new location onscreen.
How to Zero-in a Location with Terrain Navigator?
 Suppose you vaguely remember hearing about a real cool hike to the top of a mountain that has an amazing view. You know it’s somewhere around Waldo Lake, Oregon, but the name of the mountain just isn’t coming to mind. You think it might have something to do with apples: Gala, Granny Smith, Braeburn, maybe Fuji. Even with fuzzy information like this, Terrain Navigator can help you zero in on the location. Here’s how:
- Under the state map, click the Find button. A pop-up menu appears.
- Choose the Search All Place Names menu item. The Search All Place Names dialog box opens.
- In the Keyword text box, enter the place name you want to search for. In this example, enter Fuji.
- Click the Find button. A list of places that match your search text is displayed. Ah, ha! There’s Fuji Mountain. That rings a bell.
- Double-click the place name that you want to view.
Displaying Maps and Finding Places with Terrain Navigator

When Terrain Navigator starts up, a map of the state or region that you’ve installed on your PC is displayed. Here are the basic rules of engagement:
- If you know the general area you’d like to view, click there on the map. A grid appears in the vicinity of where you click. Each of the rectangles in the grid represents a 1:24,000 USGS topographic map.
- Moving the cursor over the grid displays the map name at the top of the window that’s associated with a rectangle.
- Double-click a rectangle to display a map.
- If you know the USGS map name, you can select it from the Map Name drop-down list, which displays all the map names associated with the currently selected grid.
Double-clicking a grid rectangle is one way to display a map, but here are quicker and more precise ways to view a specific location. You can display a map by searching for
- City or town name
- ZIP code
- Coordinates
- Place names
- Features you’ve previously marked on the map
Friday, April 30, 2010
Discovering Terrain Navigator

Maptech’s Terrain Navigator (www.maptech.com) was one of the first commercial, Windows topographic map programs. (In the old days it was known as TopoScout.) Over the years, Terrain Navigator has evolved into a sophisticated, powerful, electronic mapping tool.
You can purchase different versions of Terrain Navigator. The program that accesses map data is the same, but the maps that come bundled on CD-ROMs are different. Different versions of Terrain Navigator provide topographic maps for individual states and different regions of the U.S. The majority of commercial map programs are also sold this way. Plan on spending around a hundred dollars for a complete set of Terrain Navigator digital maps for a single state. You use Terrain Navigator’s main features — which most other topographic map products share — to help you
- Quickly find locations by name or coordinates.
- Accurately measure distance and area.
- Display terrain three-dimensionally.
- Show elevation profiles of routes of travel.
- Customize maps with labels, markers, and routes.
- Interface maps with GPS receivers to upload and download waypoints, routes, and tracks or use for real-time tracking.
Maptech has a free demo version of Terrain Navigator that comes with a single map of a wilderness area in Colorado. You can download the demo at www.mpatech.com/support/downloads.cfm. Be sure to read through the online help and tutorial because it describes a number
Using Maptech Terrain Navigator
 If you spend a lot of time off the beaten path in the mountains, hills, deserts, and plains, you should consider using topographic mapping software. These programs come bundled with United States Geological Survey (USGS) digital maps and are a perfect companion for any outdoor enthusiast. Before you head off into the wilds, you can print a topographic map of an area you’re interested in visiting and even plan your trip on your PC. If you have a GPS receiver, you can interface it with the map program to see exactly where you’ve been or upload waypoint and route information entered on the electronic map to your GPS receiver.
Commercial topographic software packages are easy to use, convenient (you don’t need to find and download maps to use them), and economical. Most of the map products on the market cost under $100 and give you 1:24,000 scale map coverage of a state or region; for the same price, other software provides less-detailed 1:100,000 scale maps of the entire U.S. This is a bargain considering that a paper version of a USGS topographic map costs around $7, and you might have to buy up to a thousand maps to fully cover a single state. In this section, I discuss commercial software packages that offer topographic maps of the U.S. I focus primarily on Maptech’s Terrain Navigator to illustrate these programs. Although they sport different user interfaces, most commercial topographic map programs share the same basic capabilities and features. At the end of this section, I briefly review some other popular topographic map programs.
Wednesday, March 31, 2010
Other Street Navigation Software

In addition to Street Atlas USA, here are two other popular street navigation programs available for navigating the roads of America. I don’t have enough space to fully describe them, but here’s some general information in case you’re shopping for software.
New versions of street navigation software are usually released annually with new street and POI data as well as new features. If you travel in an area that doesn’t experience much growth or change, you probably don’t need to upgrade every year. On the other hand, because all the street navigation software packages retail for under $50, it’s not that expensive to stay current.
Microsoft Streets & Trips
Microsoft’s Streets & Trips is a popular alternative to DeLorme’s software. The program has all the basic street navigation features, including some advanced features such as saving a map as a Web page, downloading current road construction information from the Internet, and creating drive time zones (such as show me all the places I can drive to from a certain location in under an hour). The software is easy to use and comes bundled with Pocket Streets, the Pocket PC version of Streets & Trips. streets.
Rand McNally StreetFinder & TripMaker Deluxe
Rand McNally, in the map business for over 130 years, is one of the main providers of U.S. paper street maps and road atlases. The StreetFinder & TripMaker Deluxe software package provides all the features you’d expect in a street navigation program, along with Mobile Travel Guide ratings for hotels and restaurants and suggested scenic tours and one-day driving trips. To read more about the product, go to www.randmcnally.com.
GPS car navigation systems

Street navigation software coupled with a laptop and GPS receiver isn’t your only option to stay found while driving through the asphalt jungle. GPS car navigation systems are starting to become popular as factory-installed options and third-party add-ons for cars and trucks. These systems are streamlined versions of street navigation programs, offering basic navigation features such as real-time map display, address searches, and route planning.
Car navigation systems range from portable, handheld GPS receivers that are equally at home on the trail or the road to systems permanently installed in a vehicle. Some of the more sophisticated products use gyroscopes, connections to the Vehicle Speed Sensor (car-speak for a speedometer), and three-axis accelerometers to provide speed and distance information when a GPS signal is temporarily lost; such as in tunnels or urban areas with tall buildings. I have to admit I’m not a true road warrior and don’t spend lots of time in my car. However, I did have a chance to try out a Magellan RoadMate GPS navigation system (www.magellangps.com) for a while and was pretty impressed.
RoadMate mounts on your dashboard (as shown here) and is portable so you can easily transfer it from one car to another. The version I tested had an internal hard drive that was preloaded with street maps of the entire U.S., so you can just plug it into your cigarette lighter and go. This is perfect for a business traveler who just flew into a city he’s never been to before and has to spend the next couple of days in a rental car trying to find his way around. Routes are calculated in a matter of seconds, and a large, high-resolution map screen keeps your progress updated. And with a touch screen, voice prompts, and a simple user interface, even my nontechnical friends and family members were able to figure out how to use it in no time.
Granted, the RoadMate is a single purpose device, costs about as much as a low-end laptop, and doesn’t have all the features of a street navigation software package. However, if I were regularly spending a lot of time on the road or visiting cities I didn’t know very well, I’d give some serious consideration to it or a similar GPS navigation system. My crystal ball tells me it won’t be too many years into the future when in-car navigation systems start to become standard in most new cars and trucks.
Moving Maps with Earthmate

In addition to its mapping software, DeLorme also offers the small Earthmate GPS receiver that’s designed to work with Street Atlas USA and other map programs that use GPS data. (You can use other types of GPS receivers with Street Atlas USA, too, but the Earthmate is designed to work with the program with a minimal amount of setup.)
You can connect the Earthmate to a laptop via a Universal Serial Bus (USB) cable, serial cable, or a PowerPack that supports Bluetooth wireless communications. After you have the GPS receiver hooked up and Street Atlas is running, the two general modes of operation are
- General navigation: Street Atlas USA processes the received GPS data and displays your current position on the map with a series of dots that shows where you’ve traveled. As you move, the map automatically moves to show your position. In addition, your speed, direction of travel, and GPS satellite information is shown in the program’s GPS tab8.
- Route: After you create a route in addition to the general navigation features, Street Atlas USA displays turn-by-turn directions onscreen, informing you how far your destination is and the travel time to your destination. If you have the voice feature enabled, Street Atlas USA announces the directions; you can choose from several different types of voices. If you’re driving by yourself, be careful when using the GPS features of Street Atlas USA with your laptop sitting next to you on the passenger seat. Fight the tendency to get distracted from your driving while you look at the screen and use the mouse and keyboard to enter commands. I recommend someone riding shotgun — that is, a navigator who’s in charge of running Street Atlas USA. If you drive solo a lot, get a laptop-mounting bracket that places your computer in a more visible and easy-to-use location.
Saturday, February 27, 2010
Printing and saving directions

After you have a map and driving directions (read earlier sections to follow me to Sam Wo’s), you may need to make copies. Street Atlas USA has a number of options for getting the information off your computer screen and printing it to paper or saving it to a file.
To print or save maps and directions, click the Print tab. You see two buttons:
- Click the Map button for options to print or save the current map.
- Click the Route button for print and save options of the current route.
Saving and printing maps
All the Print and Save command buttons are next to the Overview Map on the
far right of the Print tab area. You have buttons for
- Printing the current map
- E-mailing the print area as an attachment
- Saving the print area to disk as a graphics file
- Copying the print area to the Clipboard If you select the Print Preview check box, the map is reduced in scale, and a rectangle is displayed around the print area.
Saving and printing routes
You can also save and print route information in a number of different formats, including an overview map with directions, turn-by-turn details, and as strip maps (detailed maps that follow a route with directions in the margins). Check the type of directions you’d like to create, using the Save and Print command buttons at the far end of the Tab area to output them. Figure shows a preview of a Travel Package, which is a format that prints the route map with directions at the bottom of the page.
If you want only a text version of the route directions, click the Route button in the Print tab and then mark the Directions check box. You can then either save the directions as a text file or e-mail them to a friend.
If you end up in Chinatown, the entrance to Sam Wo’s restaurant is through the street-level kitchen, so don’t think you’re in the wrong place. Head up the narrow stairs to the second floor and don’t disturb the cooks on your way up. Bon appétit!
Creating a route with DeLorme Street Atlas USA,

If you’ve followed the chapter to this point, you can use the example map created in the earlier section, “Finding an Address with Street Atlas USA.” Suppose I want to give my friends this map of Chinatown, showing where Sam Wo’s restaurant is located. Great, but that’s not going to be much help if they’ve just arrived at the airport and are driving into the city. For their needs, I use Street Atlas USA to create a route for them to follow to noodle nirvana.
- Click the Route tab.
- In the Start text box, enter your starting address. I use a cool Street Atlas USA feature that lets you use the three-letter code of an airport. I enter SFO, which is the code for San Francisco International Airport.For the destination, enter the address in the Finish text box. Here, I enter Sam Wo’s address: 813 Washington Street, 94108. When you enter a ZIP code as part of the search, Street Atlas USA removes the ZIP code from the Finish text box when the calculated route is displayed. The ZIP is required for the search but isn’t shown with the route.
- Click the Calculate button.
Sunday, January 31, 2010
Getting from Here to There with Street Atlas USA
Knowing the address of someplace and where it’s located is a start, but getting there in a timely fashion without getting lost or frustrated is the true test of a driver (or his or her navigator).
One of the benefits of street navigation software is that it can automatically generate a route between two or more points. The software examines the roads between your starting point and destination, measuring distance and factoring in speed limits to select either the shortest or fastest route. Street navigation software can give you only its best guess when it comes to a route. A program can’t account for new roads that were built after the map data was compiled or local traffic patterns. You’ll probably be able to find faster and more direct routes in cities based on your own local knowledge and experience. Although routes from software might not always be perfect, they’re much more accurate than guessing or driving around aimlessly.
Street Atlas USA has a number of powerful options for creating routes. To give you a better idea of how route finding works, start off simple.
Finding an Address with Street Atlas USA

Whenever I’m in San Francisco, I always try to visit Sam Wo’s, my favorite authentic, Chinese noodle joint, located smack-dab in the middle of Chinatown. Anytime I hear about friends or acquaintances heading to San Francisco, I always tell them to head downtown and check out this famous Chinese fixture. It’s been around for 100 years, Kerouac and Ginsberg hung out there, and it was home to arguably the rudest waiter in the world. If you don’t know San Francisco, finding this restaurant can be challenging. And even if you can get around the City by the Bay fairly well, giving precise directions to visitors can also be a little demanding. This is where street navigation programs like Street Atlas USA really shine. As an example of finding a location and creating a map to get to it, here’s how to find Sam Wo’s restaurant:
- Click the Find tab and then click the QuickSearch button. You can perform several different types of searches, but this is a simple QuickSearch. (I talk about Advanced searches and Radar in a minute.) The Find tab options and commands are shown in Figure.
- In the Search For text box, enter the address you want to find. Sam Wo’s restaurant is located at 813 Washington Street, 94108. You can enter the city and state along with the address, but if you know the ZIP code, it’s quicker and easier to use it instead.
- Click the Search button. Street Atlas USA searches through map and street data; if the address is valid, a map of the location is displayed. In this case, Sam Wo’s is exactly where I remembered it to be.
- Advanced searches: As the name suggests, this option performs more detailed, advanced searches. You can search by categories (such as rest areas, schools, and parks) as well as specify searches take place within a certain area (such as a ZIP code, county, or the current displayed map).
- Radar searches: This is cool feature that lets you search for travelrelated POIs within a certain distance of the current center of the map — or if you’re using a GPS receiver with Street Atlas USA, from your current location.
Getting POI information

Getting Point of Interest information from Street Atlas USA is a snap.
Here’s how.
When you zoom in to level 15, you start to see POIs on the map, such as restaurants, gas stations, theaters, hotels, and other businesses and services. At Zoom Data level 16, symbols appear that let show you what the POI is. For example, a plate with a fork and knife means a restaurant. If you don’t know what a symbol means, click the HELP button in the window title and choose Map Legend from the menu to display a list of all the map symbols and their meanings.
When you move the cursor over a POI, the business or service name, its phone number (if available), and the type of POI are shown at the bottom of the map. You can also get more information about a POI (or any map feature) by moving the cursor over the POI, right-clicking, and choosing Info from the pop-up menu. Information about the POI appears in the Tab area, which you can view by clicking the Info tab, as shown in Figure. Don’t treat the POI database like an up-to-date phone directory. If you look up restaurants, gas stations, and other businesses in your city, you’ll probably find a few listed that are out of business and others that are missing. DeLorme and other map companies try to keep POI data as current as possible, but because businesses come and go so often, it’s difficult to keep up with all the changes.
Subscribe to:
Comments (Atom)