
After you have an aerial photo displayed, navigate inside the image. USAPhotoMaps has a number of different commands to view and manipulate the photo.
The datum used for all TerraServer-USA maps is NAD 83. This is nearly identical to the WGS 84 datum used as a default by GPS receivers. If you plan on using your GPS receiver with USAPhotoMaps, be sure that the datum settings match.
The first thing you’ll notice is that when you move the mouse cursor around the screen, map coordinates appear in the window title bar. This feature allows you to move the cursor over a feature that’s shown on the aerial photo and get its precise coordinates.
You can change how you want the coordinates displayed from the View menu. Choose the Lat/Lon item and then specify whether you want the coordinates shown in decimal degrees, degrees and decimal minutes, degrees/minutes/ seconds, or UTM formats.
Press the X key to display a dialog box with the coordinates that the cursor is currently over. You can copy the coordinates from this dialog box and paste them into another program.
Thursday, September 30, 2010
Downloading Aerial Photographs
The first time you run USAPhotoMaps, a dialog box appears that prompts you to create a new map. You need to enter the following:
• Universal Transverse Mercator (UTM)
If you don’t know the latitude and longitude coordinates of the location you’re interested in seeing, quickly skip over to Chapter 11 to read how to find coordinates of place names.
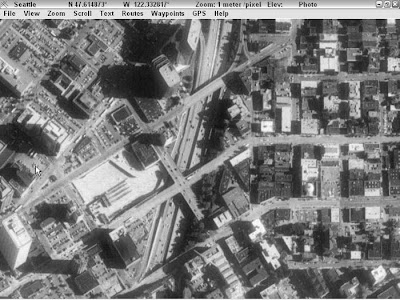
As an example, create an aerial photomap of Seattle, Washington.
1. Enter the name, latitude, and longitude in the New Map dialog box.
• Name: Seattle
• Latitude: 47.61431
• Longitude: 122.32898
2. Click OK.
A series of gray squares appear onscreen.
3. Download aerial photos from TerraServer-USA for the area that you specified (with the latitude and longitude coordinates). Make sure that you’re connected to the Internet and then press the F key.
A mosaic of aerial photograph images replaces the gray squares as the screen is filled with data from TerraServer-USA. The final result is shown in Figure below.
If you’re using a firewall, your computer might complain when USAPhotoMaps tries to connect to TerraServer-USA. Because the program is just downloading map data, you can give permission for USAPhotoMaps to access the Internet. If you plan to use USAPhotoMaps to build an extensive aerial photo collection, a high-speed Internet connection will make your life much easier. Each individual aerial photo or topographic map image in the displayed mosaic is roughly 50–200K in size. (The actual size depends on how much unique terrain is shown in the image.) At 2 meters-per-pixel resolution, it takes 70 images to fill the screen of a 1024 x 768 monitor; that’s anywhere from 7–17MB of data to download.
- What you want to name the map.
- The coordinates of the area you’re interested in viewing. The coordinates can be in either
• Universal Transverse Mercator (UTM)
If you don’t know the latitude and longitude coordinates of the location you’re interested in seeing, quickly skip over to Chapter 11 to read how to find coordinates of place names.
As an example, create an aerial photomap of Seattle, Washington.
1. Enter the name, latitude, and longitude in the New Map dialog box.
• Name: Seattle
• Latitude: 47.61431
• Longitude: 122.32898
2. Click OK.
A series of gray squares appear onscreen.
3. Download aerial photos from TerraServer-USA for the area that you specified (with the latitude and longitude coordinates). Make sure that you’re connected to the Internet and then press the F key.
A mosaic of aerial photograph images replaces the gray squares as the screen is filled with data from TerraServer-USA. The final result is shown in Figure below.

If you’re using a firewall, your computer might complain when USAPhotoMaps tries to connect to TerraServer-USA. Because the program is just downloading map data, you can give permission for USAPhotoMaps to access the Internet. If you plan to use USAPhotoMaps to build an extensive aerial photo collection, a high-speed Internet connection will make your life much easier. Each individual aerial photo or topographic map image in the displayed mosaic is roughly 50–200K in size. (The actual size depends on how much unique terrain is shown in the image.) At 2 meters-per-pixel resolution, it takes 70 images to fill the screen of a 1024 x 768 monitor; that’s anywhere from 7–17MB of data to download.
Enhancing TerraServer-USA with USAPhotoMaps

TerraServer-USA is a popular Web site that displays free aerial photographs and topographic maps of the U.S. that are produced by the United States Geological Survey (USGS).
And although TerraServer-USA is a great Web-hosted mapping service, it has several limitations:
- Only a relatively small geographic area can be displayed.
- You can’t edit downloaded photos and maps.
- GPS receiver data can’t be used with the photos and maps.
Subscribe to:
Comments (Atom)